
10 Effective Yoga Poses to Strengthen Your Lower Abs
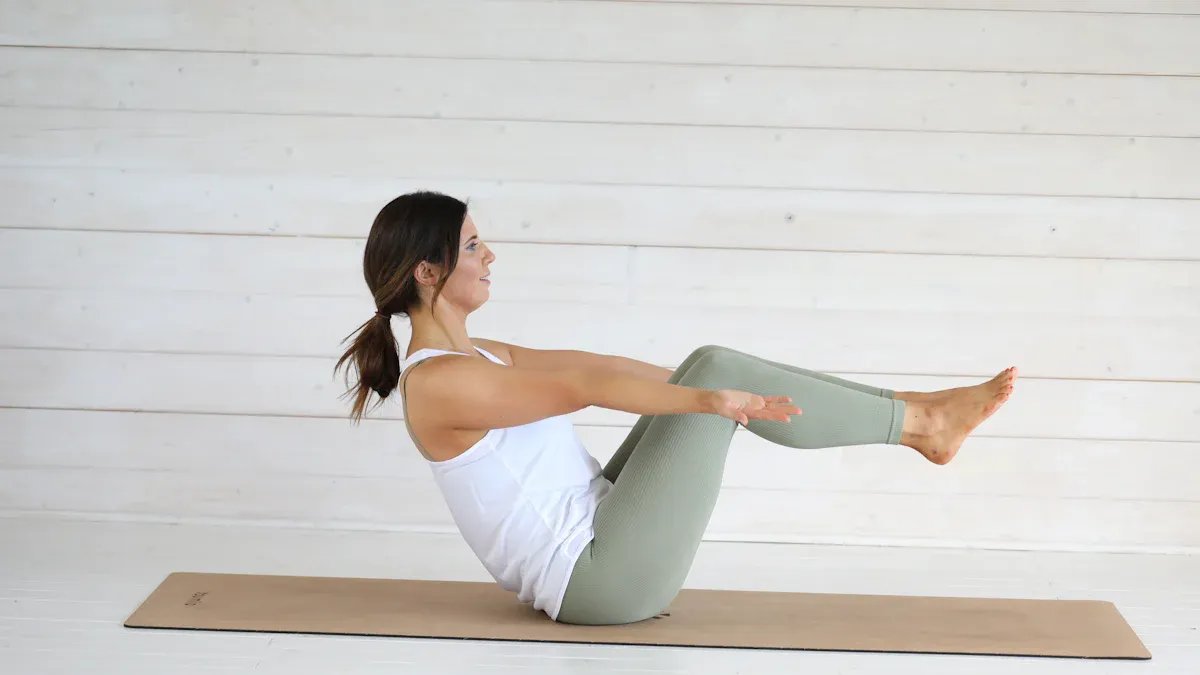
Image Source: unsplash
Lower abdominal strength plays a vital role in your overall health. Weak lower abs can lead to issues like lower back pain and poor posture. When your core lacks strength, it can increase the risk of injury during daily activities, such as lifting or bending. Incorporating yoga poses that strengthen lower abdominal muscles effectively engages essential core groups, helping stabilize your spine. This stability not only improves posture but also supports a healthy back. By including these yoga poses into your routine, you can enhance core stability and promote better overall health.
Key Takeaways
-
Strengthening your lower abs improves overall health and posture, reducing the risk of back pain and injuries.
-
Incorporate yoga poses like Boat Pose and Plank Pose into your routine to effectively engage and strengthen your core.
-
Practice regularly, aiming for 3 to 4 times a week, to build lower abdominal strength and enhance stability.
-
Focus on your breath and core engagement during each pose to maximize benefits and maintain proper form.
-
Start with beginner-friendly modifications if needed, and gradually increase the intensity as you gain strength and confidence.
Boat Pose

Image Source: unsplash
Boat Pose Steps
To perform the Boat Pose, follow these steps:
-
Start Position: Sit on your yoga mat with your knees bent and feet flat on the floor.
-
Lean Back: Gently lean back while keeping your spine straight. Your torso should form a V-shape with your thighs.
-
Lift Your Feet: Raise your feet off the ground, bringing your shins parallel to the floor. If you can, extend your legs fully.
-
Extend Your Arms: Reach your arms forward, parallel to the ground. Keep your shoulders relaxed and away from your ears.
-
Hold the Pose: Breathe deeply and hold this position for 20 to 30 seconds. Focus on engaging your lower abs throughout the pose.
Benefits for Lower Abs
The Boat Pose is an excellent way to strengthen your lower abdominal muscles. This pose primarily targets the iliopsoas and rectus femoris muscle groups, which play crucial roles in core stability and hip flexion.
| Muscle Group | Description |
|---|---|
| Iliopsoas | Composed of iliacus and psoas major, crucial for hip flexion and lumbar spine stabilization. |
| Rectus Femoris | Part of the quadriceps, assists in hip flexion and knee extension, originating from the pelvis. |
Practicing this pose regularly can enhance your core strength, improve balance, and promote better posture. As you hold the pose, you engage your lower abs, which helps to stabilize your spine. This stability is essential for preventing injuries during other activities. By incorporating yoga poses that strengthen lower abdominal muscles into your routine, you can achieve a more toned core and overall improved fitness.
Plank Pose
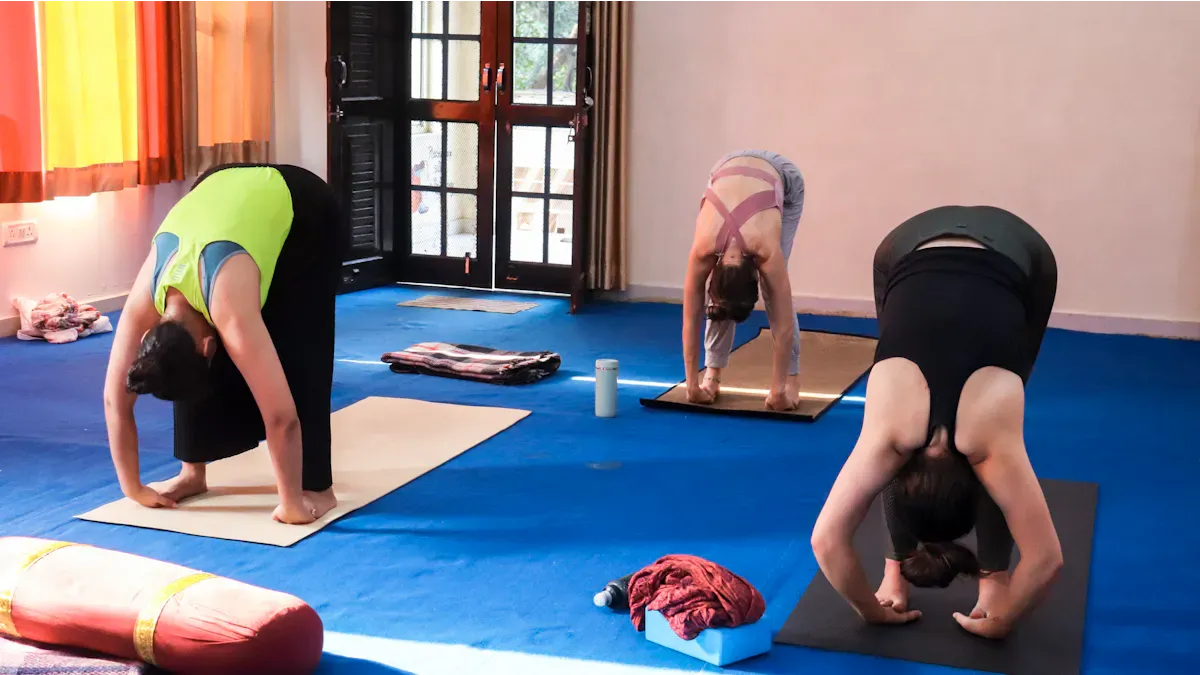
Image Source: pexels
Plank Pose Steps
To perform the Plank Pose, follow these steps:
-
Start Position: Begin on your hands and knees on your yoga mat.
-
Extend Your Legs: Step your feet back, one at a time, until your body forms a straight line from head to heels.
-
Engage Your Core: Tighten your abdominal muscles. Keep your hips level and avoid sagging or lifting them too high.
-
Hold the Position: Maintain this pose for 20 to 60 seconds. Focus on your breath and keep your gaze slightly forward.
Benefits for Lower Abs
The Plank Pose is a powerful exercise for strengthening your lower abdominal muscles. Research shows that this pose activates lower abdominal stabilizers more effectively than many traditional core exercises. Here are some key benefits:
-
Enhanced Muscle Activation: The long-lever posterior-tilt plank significantly boosts activation of lower abdominal muscles compared to standard planks. Variations that involve suspension training also show higher activation levels.
-
Core Stability: Strengthening your core helps absorb forces from daily activities. A strong core decreases the forces that move through your joints, reducing the risk of injuries like hip flexor strains and sports hernias.
-
Back Pain Relief: Core strengthening can provide relief for back pain. By engaging your lower abs, you support your spine and improve overall posture.
Incorporating yoga poses that strengthen lower abdominal muscles, like the Plank Pose, into your routine can lead to better core stability and overall health.
Leg Raises
Leg Raises Steps
To perform Leg Raises, follow these steps:
-
Start Position: Lie flat on your back on a yoga mat. Keep your legs straight and your arms at your sides.
-
Engage Your Core: Tighten your abdominal muscles. This engagement helps protect your lower back during the exercise.
-
Lift Your Legs: Slowly raise your legs toward the ceiling. Keep them straight and avoid bending your knees.
-
Lower Your Legs: Gently lower your legs back down without letting them touch the floor. Stop just above the ground to maintain tension in your abs.
-
Repeat: Perform this movement for 10 to 15 repetitions, focusing on your breath and core engagement.
Benefits for Lower Abs
Leg Raises are highly effective for targeting your lower abdominal muscles. Research shows that this exercise activates the lower abs significantly. In a study comparing muscle activation during hanging leg raises and seated leg tucks, results indicated substantial differences in muscle activation. The hanging leg raises produced a t value of 5.04 (p-value=.00) for lower abs, highlighting their effectiveness.
Here are some key benefits of incorporating Leg Raises into your routine:
-
Strengthens Lower Abs: This exercise specifically targets the rectus abdominis, particularly the lower portion. Strengthening this area helps improve overall core stability.
-
Enhances Hip Flexor Strength: Leg Raises also engage your hip flexors, which support movements like walking and running.
-
Improves Posture: A strong core contributes to better posture. By strengthening your lower abs, you help maintain a neutral spine during daily activities.
Incorporating yoga poses that strengthen lower abdominal muscles, such as Leg Raises, can lead to a more toned core and improved fitness levels.
One-Legged Bridge
One-Legged Bridge Steps
To perform the One-Legged Bridge, follow these steps:
-
Start Position: Lie on your back with your knees bent and feet flat on the floor, hip-width apart.
-
Lift Your Hips: Press your feet into the mat and lift your hips toward the ceiling. Your body should form a straight line from your shoulders to your knees.
-
Extend One Leg: Slowly extend one leg straight up toward the ceiling. Keep your hips level and avoid letting them drop.
-
Engage Your Core: Tighten your abdominal muscles to maintain stability. Focus on keeping your spine neutral.
-
Hold the Pose: Maintain this position for 20 to 30 seconds. Switch legs and repeat.
Benefits for Lower Abs
The One-Legged Bridge offers several benefits for strengthening your lower abdominal muscles. This pose engages your core effectively, promoting stability and strength. Here are some key advantages:
- Core Activation: The One-Legged Bridge activates both the upper and lower rectus abdominis muscles. This engagement helps stabilize your core and maintain a neutral spine during the exercise.
| Muscle Group | Function | Engagement Type |
|---|---|---|
| Upper Rectus Abdominis | Stabilizes the core and maintains a neutral spine during the exercise. | Isometric contraction |
| Lower Rectus Abdominis | Stabilizes the core and helps in curling the spine. | Isometric contraction |
-
Improved Balance: Balancing on one leg challenges your stability, enhancing your overall balance and coordination.
-
Strengthens Glutes and Hamstrings: This pose also targets your glutes and hamstrings, contributing to a well-rounded lower body workout.
Incorporating yoga poses that strengthen lower abdominal muscles, like the One-Legged Bridge, can lead to a more toned core and improved fitness levels.
Side Plank
Side Plank Steps
To perform the Side Plank, follow these steps:
-
Start Position: Lie on your side with your legs straight and stacked on top of each other.
-
Support Your Body: Place your elbow directly under your shoulder. Your forearm should be perpendicular to your body.
-
Lift Your Hips: Engage your core and lift your hips off the ground. Your body should form a straight line from head to heels.
-
Hold the Position: Keep your neck relaxed and gaze forward. Hold this pose for 20 to 30 seconds, then switch sides.
Benefits for Lower Abs
The Side Plank is an effective pose for strengthening your lower abdominal muscles. This exercise primarily targets the obliques and quadratus lumborum, which are essential for lateral core strength. Here are some key benefits:
- Enhanced Muscle Activation: Side bridges primarily target the obliques and quadratus lumborum. These exercises contribute to lateral core strength, indicating their effectiveness in activating the oblique muscles.
| Exercise | Targeted Muscles | Contribution to Core Stability |
|---|---|---|
| Side Plank | Obliques, Quadratus Lumborum | Enhances lateral core strength |
-
Improved Core Stability: Strengthening your obliques helps stabilize your spine during various movements. A strong core supports your posture and reduces the risk of injuries.
-
Increased Balance: Balancing on one arm challenges your stability. This challenge improves your overall coordination and balance.
Incorporating yoga poses that strengthen lower abdominal muscles, like the Side Plank, can lead to a more toned core and better overall fitness.
Tree Pose
Tree Pose Steps
To perform the Tree Pose, follow these steps:
-
Start Position: Stand tall with your feet together and arms at your sides.
-
Shift Your Weight: Balance on your left foot. Bend your right knee and place your right foot on your inner left thigh or calf. Avoid the knee.
-
Find Your Balance: Press your foot into your thigh while rooting down through your standing leg.
-
Raise Your Arms: Bring your arms overhead, palms together. Keep your shoulders relaxed.
-
Hold the Pose: Focus on a point in front of you. Hold this position for 20 to 30 seconds, then switch sides.
Benefits for Lower Abs
The Tree Pose offers several benefits for your lower abdominal muscles. This pose activates your obliques to maintain proper torso alignment over your hips. You prevent leaning toward the lifted leg, which enhances your core stability. The transversus abdominis also engages to minimize swaying, further contributing to your core strength.
Here are some additional benefits of practicing Tree Pose:
-
Strengthens Core and Legs: This pose builds strength in your legs, glutes, and core. It improves overall balance and leg strength.
-
Enhances Focus and Concentration: Practicing Tree Pose enhances mental clarity and presence. You cultivate a sense of focus that can benefit your daily activities.
-
Improves Posture: By engaging your lower abs, you support better posture, which is essential for overall health.
Incorporating yoga poses that strengthen lower abdominal muscles, like Tree Pose, can lead to a more toned core and improved fitness levels.
Remember to breathe deeply and stay present in the moment as you practice this pose.
Half Moon Pose
Half Moon Pose Steps
To perform the Half Moon Pose, follow these steps:
-
Start Position: Begin in a standing position with your feet together.
-
Step Back: Step your left foot back about three feet. Keep your right foot forward.
-
Bend Forward: Hinge at your hips and lower your torso toward the ground. Place your right hand on the floor or a block.
-
Lift Your Left Leg: As you balance, lift your left leg parallel to the ground. Keep it straight and flex your foot.
-
Open Your Chest: Rotate your torso to the left and extend your left arm toward the ceiling. Look up at your left hand.
-
Hold the Pose: Maintain this position for 20 to 30 seconds. Focus on your breath and engage your core.
Benefits for Lower Abs
The Half Moon Pose offers numerous benefits for your lower abdominal muscles. This pose fully engages your core, which strengthens the lower abs. It also activates the obliques on the side of the lifted leg, promoting stability and alignment. Additionally, it engages the transversus abdominis, which helps in rounding out the pelvis.
Here are some key benefits of practicing Half Moon Pose:
-
Strengthens Lower Abs: Engaging your core fully helps build strength in your lower abdominal muscles.
-
Improves Stability: Activating the obliques enhances your stability during various movements.
-
Promotes Alignment: Engaging the transversus abdominis supports proper pelvic alignment.
Incorporating yoga poses that strengthen lower abdominal muscles, like the Half Moon Pose, can lead to a more toned core and improved overall fitness.
Remember to breathe deeply and maintain focus as you hold this pose.
Knee-to-Nose Plank
Knee-to-Nose Plank Steps
To perform the Knee-to-Nose Plank, follow these steps:
-
Start Position: Begin in a standard plank position. Place your hands directly under your shoulders and keep your body in a straight line from head to heels.
-
Engage Your Core: Tighten your abdominal muscles. This engagement helps maintain stability throughout the movement.
-
Bring Your Knee Forward: Slowly draw your right knee toward your chest. Keep your foot off the ground as you move.
-
Return to Plank: Extend your right leg back to the starting plank position. Maintain a straight line with your body.
-
Repeat: Perform this movement for 10 to 15 repetitions on each side. Focus on your breath and core engagement throughout the exercise.
Benefits for Lower Abs
The Knee-to-Nose Plank is an excellent exercise for strengthening your lower abdominal muscles. This pose engages your core effectively, promoting stability and strength. Here are some key benefits:
-
Targets Lower Abs: This exercise specifically focuses on the rectus abdominis, particularly the lower portion. Strengthening this area improves overall core stability.
-
Enhances Core Activation: By drawing your knee toward your chest, you activate your lower abs more than in a standard plank. This increased activation helps build strength.
-
Improves Balance and Coordination: Balancing in the plank position while moving your knee forward challenges your stability. This challenge enhances your overall coordination.
Incorporating yoga poses that strengthen lower abdominal muscles, like the Knee-to-Nose Plank, can lead to a more toned core and improved fitness levels.
Remember to breathe deeply and maintain focus as you perform this exercise.
Dolphin Pose
Dolphin Pose Steps
To perform the Dolphin Pose, follow these steps:
-
Start Position: Begin on your hands and knees on your yoga mat. Your wrists should be directly under your shoulders, and your knees should be under your hips.
-
Lower Your Forearms: Place your forearms on the mat, ensuring your elbows are shoulder-width apart. Interlace your fingers behind your head or keep your palms flat on the mat.
-
Lift Your Hips: Tuck your toes under and lift your hips toward the ceiling. Your body should form an inverted V-shape.
-
Engage Your Core: Tighten your abdominal muscles. This engagement helps stabilize your spine and supports your lower back.
-
Hold the Pose: Maintain this position for 20 to 30 seconds. Focus on your breath and keep your neck relaxed.
Benefits for Lower Abs
The Dolphin Pose provides several benefits for your lower abdominal muscles. This pose effectively engages your core, promoting strength and stability. Here are some key advantages:
-
Strengthens Lower Abs: By holding this pose, you activate your rectus abdominis and transversus abdominis. This activation helps build strength in your lower abs.
-
Improves Core Stability: Engaging your core during the Dolphin Pose enhances your overall stability. A strong core supports your spine and reduces the risk of injuries.
-
Enhances Shoulder Strength: This pose also strengthens your shoulders and upper back. Strong shoulders contribute to better posture and overall body alignment.
Incorporating yoga poses that strengthen lower abdominal muscles, like the Dolphin Pose, can lead to a more toned core and improved fitness levels.
Remember to breathe deeply and stay focused as you practice this pose.
Warrior III
Warrior III Steps
To perform the Warrior III pose, follow these steps:
-
Start Position: Stand tall with your feet together and arms at your sides.
-
Shift Your Weight: Shift your weight onto your left foot.
-
Lift Your Right Leg: Slowly lift your right leg behind you. Keep it straight and parallel to the ground.
-
Extend Your Arms: Reach your arms forward, parallel to the ground. Your body should form a straight line from your fingertips to your lifted foot.
-
Engage Your Core: Tighten your abdominal muscles to maintain balance. Focus on keeping your hips level.
-
Hold the Pose: Maintain this position for 20 to 30 seconds. Switch legs and repeat.
Benefits for Lower Abs
Warrior III is a powerful pose that strengthens your lower abdominal muscles. This pose engages your core effectively, promoting stability and balance. Here are some key benefits:
-
Core Activation: Warrior III requires you to engage your lower abs to maintain balance. This activation helps build strength in your core.
-
Improves Stability: Balancing on one leg challenges your stability. This challenge enhances your overall coordination and balance.
-
Strengthens Back Muscles: This pose also targets your back muscles, which support your spine. A strong back contributes to better posture and reduces the risk of injury.
Incorporating yoga poses that strengthen lower abdominal muscles, like Warrior III, into your routine can lead to a more toned core and improved fitness levels.
Remember to breathe deeply and focus on your balance as you hold this pose.
Practicing these yoga poses can significantly strengthen your lower abs. Each pose targets different muscle groups, enhancing your core stability and overall fitness. Regularly incorporating these poses into your routine can lead to better posture, reduced back pain, and improved balance. You can achieve a toned core and promote overall wellness by committing to these exercises. Start today and experience the benefits of yoga poses that strengthen lower abdominal muscles.
FAQ
What are the best times to practice these yoga poses?
You can practice these poses at any time. Morning sessions can energize you for the day. Evening sessions help relax your body and mind. Choose a time that fits your schedule and allows you to focus.
How often should I practice these poses?
Aim to practice these poses at least 3 to 4 times a week. Consistency is key to building strength in your lower abs. Gradually increase the duration as you become more comfortable with each pose.
Can beginners perform these poses?
Yes, beginners can perform these poses. Start slowly and focus on your form. Use props like blocks or straps for support. Listen to your body and modify poses as needed to avoid strain.
Do I need to warm up before practicing?
Yes, warming up is essential. A gentle warm-up prepares your muscles and joints for the poses. Consider doing light stretches or a few minutes of light cardio to increase blood flow before starting.
Will these poses help with back pain?
Yes, these poses can help alleviate back pain. Strengthening your lower abs supports your spine and improves posture. A strong core reduces strain on your back during daily activities.
See Also
13 Effective Yoga Poses You Can Do While Seated
5 Prenatal Yoga Poses That Alleviate Lower Back Discomfort
Beginner-Friendly Yoga Poses: What Should I Start With?